 iPhone iScene
lukeおじさんのページ
iPhone iScene
lukeおじさんのページ
SpriteKitとViewContorollerとの画面遷移の作成
SpriteKitとiOSとの組み合わせをしたくセミナーに参加し教えていただいたことに基づきSpriteKitのページをTopに置きSecondページをViewContorollerにして相互の画面遷移を行うことが出来るかを確認しました。このようにiOS制作と変わりなしに制作出来ることでゲーム機能を有効に使えることが分かりました。
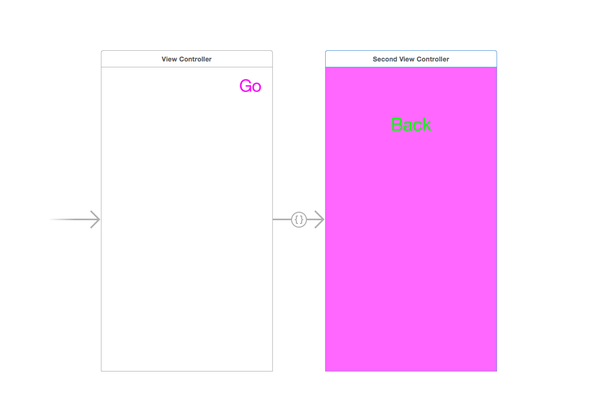
Main.storyboardの構成
TopページにGoボタン(UIKit)を配置(View Controller)
SecondページにはBackボタン(UIKit)を配置(Second View Controller)
GoボタンからSecondViewControllerにSegueで紐ずけをしています。
Objective-C言語
ViewController.hを次のように変更してみてください。
#import <UIKit/UIKit.h>
#import <SpriteKit/SpriteKit.h>
@interface ViewController : UIViewController
@end
ViewController.mを次のように変更してみてください。
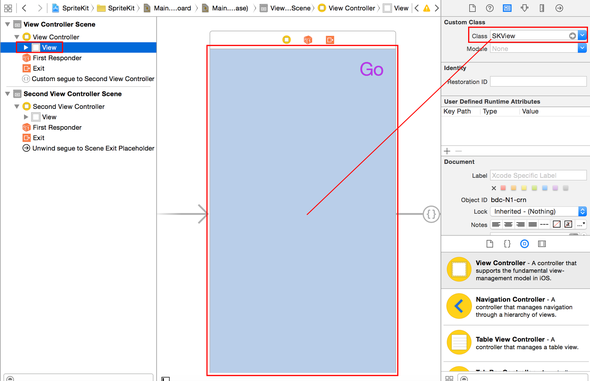
ViewのClassをSKViewにしてください。
SKView Self.viewを基にSKSceneを作成しシーンをオープンしています。
#import "ViewController.h"
#import "MyScene.h"
@interface ViewController()
@end
@implementation ViewController
- (void)viewDidLoad
{
[super viewDidLoad];
// ビュー(SKView)の設定
SKView * skView = (SKView *)self.view;
skView.showsFPS = YES;
skView.showsNodeCount = YES;
skView.showsPhysics = YES;
// シーンの作成、設定
SKScene * scene = [MyScene sceneWithSize:
skView.bounds.size];
// アスペクト比を維持して表示
scene.scaleMode = SKSceneScaleModeAspectFill;
// シーンのオープン
[skView presentScene:scene];
}
- (void)didReceiveMemoryWarning
{
[super didReceiveMemoryWarning];
// Release any cached data, images, etc that aren't in use.
}
// 次の画面ボタンアクション
- (IBAction)nextButton{
// Segueの呼び出し
[self performSegueWithIdentifier:@"goSecondViewSegue" sender:self];
}
// Segue画面遷移
-(void)prepareForSegue:(UIStoryboardSegue *)segue sender:(id)sender
{
// Segueの特定
if ( [[segue identifier] isEqualToString:@"goSecondViewSegue"] ) {
//SecondViewController *secondViewController = [segue destinationViewController];
//ここで遷移先ビューのクラスの変数receiveStringに値を渡している
//secondViewController.receiveString = sendString;
}
}
// バックExit
- (IBAction)mainViewReturnActionForSegue:(UIStoryboardSegue *)segue
{
}
@end
MyScene.hを次のように変更してみてください。
#import <SpriteKit/SpriteKit.h>
@interface MyScene : SKScene
@end
MyScene.mを次のように変更してみてください。
#import "MyScene.h"
@implementation MyScene
#pragma mark - initWithSize
// イニシャライザ
-(id)initWithSize:(CGSize)size {
if (self = [super initWithSize:size]) {
/* Setup your scene here */
self.backgroundColor = [SKColor colorWithRed:0.15
green:0.15
blue:0.3
alpha:1.0];
// ノードの追加(ラベル)
{
// 山小屋画像生成
SKSpriteNode* iv;
iv = [SKSpriteNode spriteNodeWithImageNamed:@"images.png"];
//iv = [SKSpriteNode spriteNodeWithImageNamed:@"koyo.png"];
// 下からの(0,0)桜画像のセンターを指定 山小屋表示位置
iv.position = CGPointMake(160, 160);
//iv.position = CGPointMake(160, 284);
// 山小屋表示
[self addChild:iv];
}
// 雪を降らす ノードの追加(エミッター)放射する
{
// パーティクルの参照
NSBundle *bnd = [NSBundle mainBundle];
NSString *pth = [bnd pathForResource:@"ParticleSnow" ofType:@"sks"];
SKEmitterNode *nod = [NSKeyedUnarchiver unarchiveObjectWithFile:pth];
nod.position = CGPointMake(CGRectGetMidX(self.frame),
CGRectGetMaxY(self.frame));
[self addChild:nod];
}
}
return self;
}
// FPS(Frame Per Second)毎に実行
-(void)update:(CFTimeInterval)currentTime {
/* Called before each frame is rendered */
}
@end
SecondViewController.hを次のように変更してみてください。
#import <UIKit/UIKit.h>
@interface SecondViewController : UIViewController
@end
SecondViewController.mを次のように変更してみてください。
#import "SecondViewController.h"
#import "ViewController.h"
@interface SecondViewController ()
@end
@implementation SecondViewController
- (void)viewDidLoad {
[super viewDidLoad];
NSLog(@"セカンドページ");
// Do any additional setup after loading the view.
}
- (void)didReceiveMemoryWarning {
[super didReceiveMemoryWarning];
// Dispose of any resources that can be recreated.
}
/*
#pragma mark - Navigation
// In a storyboard-based application, you will often want to do a little preparation before navigation
- (void)prepareForSegue:(UIStoryboardSegue *)segue sender:(id)sender {
// Get the new view controller using [segue destinationViewController].
// Pass the selected object to the new view controller.
}
*/
@end
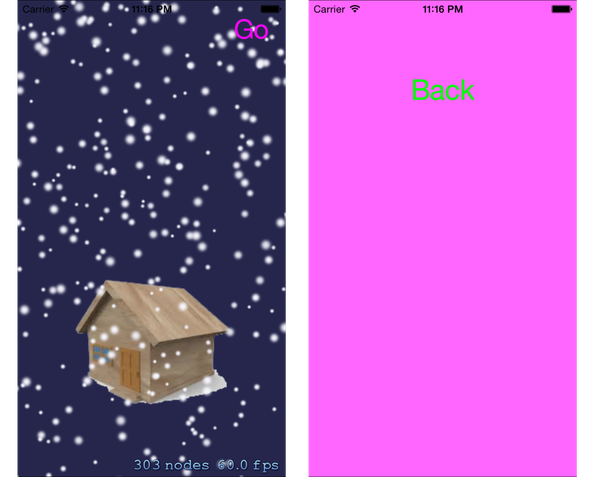
SpriteKitのTopページ(雪降る小屋)SecondページはiOSのViewControllerです。
Goボタン(UIKit)を押すとピンクページへ画面遷移します。Backボタン(UIKit)を押すとSpriteKitのTopページに戻ります。
▫️参考にしたページ
コメントをお書きください