 iPhone iScene
lukeおじさんのページ
iPhone iScene
lukeおじさんのページ
ページ型(Page-based)
画面自体をフリックして進んでいく切り替え方法。
操作方法
画面をタップしたりスワイプしたりして操作します。
画面が小さいのでマルチタップやピンチイン・アウトなどはできません。
また、デジタルクラウン(竜頭)操作もあります。
シングルタップ:選択
縦スワイプ:縦長ページのスクロール
横スワイプ:次ページへ進む、前ページへ戻る、ページの切り替え
強くタップ:メニュー表示
デジタルクラウン(竜頭)の回転:拡大、縮小、画面スクロール
デジタルクラウン(竜頭)の押し込み:ホーム画面に戻る
PageController制作に関して注意すること
起動時にPage分全部をメモリに取り込むので画像表示に時間が掛かるのでページ数には注意が必要である。
階層ページ表示の方が各ページごとメモリに読む込むのでページが多いものはそちらにした方が良い。
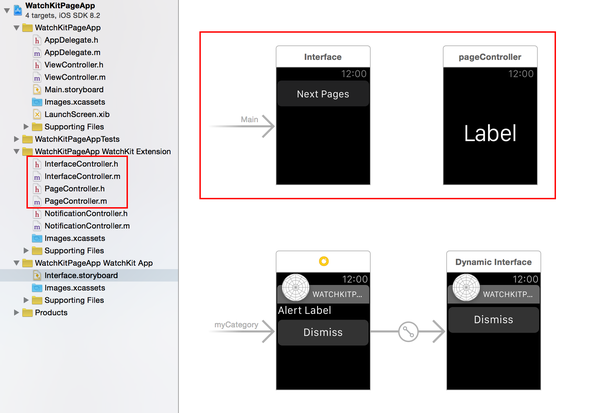
Apple Watch PageControllerの作成方法
プロダクト名をWatchKitAnimation02とします。
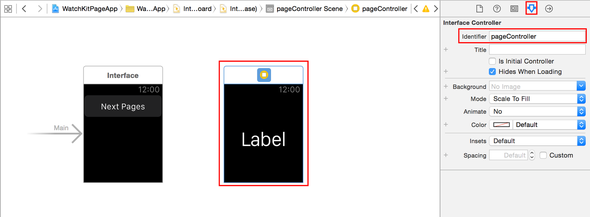
画面は、InterfaceとpageControllerの2つになります。
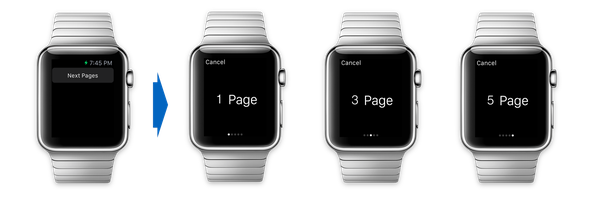
Interfaceには、Next Pagesボタンを貼り付けます。
pageControllerには、Labelを貼り付けます。
Interface画面記述

InterfaceController.mに記述します。
#import "InterfaceController.h"
@interface InterfaceController()
@end
@implementation InterfaceController
- (void)awakeWithContext:(id)context {
[super awakeWithContext:context];
// Configure interface objects here.
}
- (void)willActivate {
// This method is called when watch view controller is about to be visible to user
[super willActivate];
}
- (void)didDeactivate {
// This method is called when watch view controller is no longer visible
[super didDeactivate];
}
// 遷移元 --> 遷移先への ボタンアクション
- (IBAction)presentPages {
// 配列 遷移先のIdentifier:pageControllerの記述が必要 遷移先と判断
NSArray *controllerNames = @[@"pageController",
@"pageController",
@"pageController",
@"pageController",
@"pageController"];
// 配列 contexts:1Page
NSArray *contexts = @[@"1",
@"2",
@"3",
@"4",
@"5"];
// 遷移先引数:contexts Page番号
[self presentControllerWithNames:controllerNames contexts:contexts];
}
@end
遷移先のPageController先を認識させるには、PageController -> InterfaceController -> Identiferに配列に記載している「pageController」を記述します。
// 配列 遷移先のIdentifier:pageControllerの記述が必要 遷移先と判断
NSArray *controllerNames = @[@"pageController",
@"pageController",
@"pageController",
@"pageController",
@"pageController"];
PageController画面記述
#import "PageController.h"
@interface PageController()
// Pege番号ラベル
@property (weak, nonatomic) IBOutlet WKInterfaceLabel *pageLabel;
@end
@implementation PageController
// 最初に呼び出されるメソッド
- (void)awakeWithContext:(id)context {
[super awakeWithContext:context];
// 引数:contextページ番号
[self.pageLabel setText:[NSString stringWithFormat:@"%@ Page", context]];
// Configure interface objects here.
}
// ユーザーにUIが表示されたタイミングで呼び出されるメソッド
- (void)willActivate {
// This method is called when watch view controller is about to be visible to user
[super willActivate];
}
// UIが非表示になったタイミングで呼び出されるメソッド
- (void)didDeactivate {
// This method is called when watch view controller is no longer visible
[super didDeactivate];
}
@end
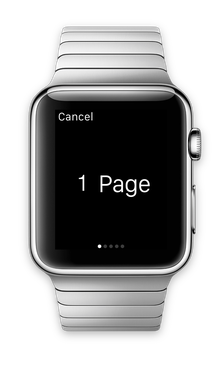
遷移先のPageControllerのラベルに「1Page」と表示方法
最初に呼び出させるメソッドawakeWithContextの引数:contextに配列分が受け継ぎされ「1Page」と表示されます。
遷移元 InterfaceController
// 配列 contexts:1Page
NSArray *contexts = @[@"1",
@"2",
@"3",
@"4",
@"5"];
// 遷移先引数:contexts Page番号
[self presentControllerWithNames:controllerNames contexts:contexts];
遷移先 PageController
// 最初に呼び出されるメソッド
- (void)awakeWithContext:(id)context {
[super awakeWithContext:context];
// 引数:contextページ番号
[self.pageLabel setText:[NSString stringWithFormat:@"%@ Page", context]];
// Configure interface objects here.
}

GitHub WatchKitPageApp
▫️参考にしたページ
コメントをお書きください