 iPhone iScene
lukeおじさんのページ
iPhone iScene
lukeおじさんのページ

TableView版のApple Watch -> iPhoneとのデータ情報更新のカウントアプリです。
WKInterfaceControllerのopenParentApplication:reply:メソッドを使うことでiPhone側の親アプリを起動することができます。現在のところ、親アプリのみ起動が可能。
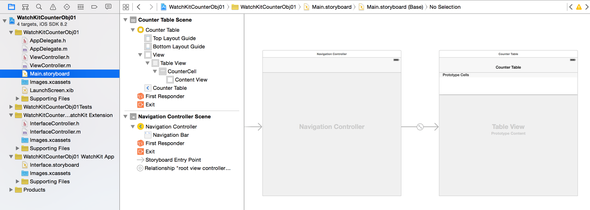
Main.storyboardでUIを作成します。
NavigationControllerとTableViewを使用します。
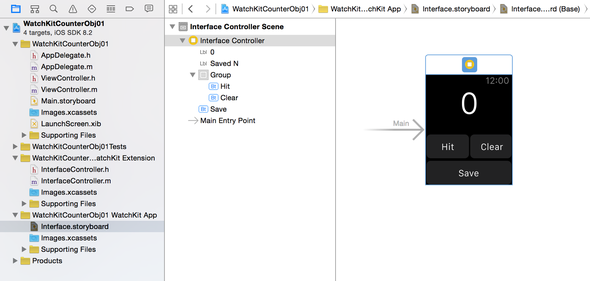
Interface.storyboardでUIを作成します。
いつものiOS開発と同じです。Label2つとButtonを3つ貼り付けます。
AppDelegate.m
#import "AppDelegate.h"
#import "ViewController.h"
@interface AppDelegate ()
@property (strong, nonatomic) NSMutableArray *tempCounterData;
@end
@implementation AppDelegate
- (void)application:(UIApplication *)application handleWatchKitExtensionRequest:(NSDictionary *)userInfo reply:(void(^)(NSDictionary *replyInfo))reply {
NSString *counterValue = [userInfo objectForKey:@"counterValue"];
// インスタンスの生成 key:"response" value(値):counterValue
NSDictionary *replyDict = @{@"response": counterValue};
// counter値をWatchKit App に返す
reply(replyDict);
// テーブル配列(tempCounterData)のカウンターデータが0ならば
if (!self.tempCounterData) {
// テーブル配列(tempCounterData)の生成
self.tempCounterData = [[NSMutableArray alloc] init];
}
// カウンターデータを配列に追加
[self.tempCounterData addObject:counterValue];
// 新しいカウンタ値を追加し、TableViewをリロードする
AppDelegate *tmpDelegate = (AppDelegate *)[[UIApplication sharedApplication] delegate];
// ViewControllerとDelegateとの接続
ViewController *vc = (ViewController *)((UINavigationController*)tmpDelegate.window.rootViewController).visibleViewController;
// ViewControllerのcounterDataにテーブル配列(tempCounterData)を転送
vc.counterData = self.tempCounterData;
// 配列操作のあとは、Table Viewをリロード
[vc.mainTableView reloadData];
}
- (BOOL)application:(UIApplication *)application didFinishLaunchingWithOptions:(NSDictionary *)launchOptions {
// Override point for customization after application launch.
return YES;
}
- (void)applicationWillResignActive:(UIApplication *)application {
}
- (void)applicationDidEnterBackground:(UIApplication *)application {
}
- (void)applicationWillEnterForeground:(UIApplication *)application {
}
- (void)applicationDidBecomeActive:(UIApplication *)application {
}
- (void)applicationWillTerminate:(UIApplication *)application {
}
@end
ViewController.m
#import "ViewController.h"
@interface ViewController ()
@end
@implementation ViewController
// 最初に呼び出されるメソッド
- (void)viewDidLoad {
[super viewDidLoad];
// Do any additional setup after loading the view, typically from a nib.
}
@end
InterfaceController.m
#import "InterfaceController.h"
@interface InterfaceController()
@property (nonatomic, assign) int counter;
@end
@implementation InterfaceController
// 最初に呼び出されるメソッド
- (void)awakeWithContext:(id)context {
[super awakeWithContext:context];
// Configure interface objects here.
NSLog(@"%@ awakeWithContext", self);
// 初期値
self.counter = 0;
}
// ユーザーにUIが表示されたタイミングで呼び出されるメソッド
- (void)willActivate {
NSLog(@"%@ will activate", self);
}
// UIが非表示になったタイミングで呼び出されるメソッド
- (void)didDeactivate {
NSLog(@"%@ did deactivate", self);
}
#pragma mark - Button actions
// HITボタンアクション
- (IBAction)incrementCounter {
[self hideSaveNotificationLabel];
self.counter++;
[self setCounterLabelText];
}
// SAVEボタンアクション
- (IBAction)saveCounter {
// 親アプリケーションにカウントを送る
NSString *counterString = [NSString stringWithFormat:@"%d", self.counter];
// NSDictionary生成 Key:"counterValue" Value(値):counterString(counter:カウント)
NSDictionary *applicationData = @{@"counterValue":counterString};
// openParentApplication:reply:メソッドを使うことでiPhone側の親アプリ(デリゲート)を起動さす。親アプリのみ起動が可能
// 一つ目の引数に渡したいデータを入れればOK
[WKInterfaceController openParentApplication:applicationData reply:^(NSDictionary *replyInfo, NSError *error) {
// iOS本体から保存された受信確認データを受け取る
int reply = [[replyInfo objectForKey:@"response"] intValue];
NSLog(@"reply count %d", reply);
// reply 通知セーブラベルにカウンター値を転送
[self.savedNotificationLabel setText:[NSString stringWithFormat:@"Saved %d", reply]];
// 通知ラベルセーブ隠されたテキストを表示
[self showSaveNotificationLabel];
}];
}
// CLERボタンアクション
- (IBAction)clearCounter {
[self hideSaveNotificationLabel];
self.counter = 0;
[self setCounterLabelText];
}
#pragma mark - Helper methods
// counterLabel表示メソッド
- (void)setCounterLabelText {
[self.counterLabel setText:[NSString stringWithFormat:@"%d", self.counter]];
}
// hideメソッド
- (void)hideSaveNotificationLabel {
[self.savedNotificationLabel setAlpha:0];
}
// showメソッド
-(void)showSaveNotificationLabel {
[self.savedNotificationLabel setAlpha:1];
}
@end
これでApple Watch側でそれぞれのカウントボタンをタップするとiPhone(親アプリ)が起動し、
Apple Watch側のカウントと親アプリ側のカウントの表示が同期します。
詳細補足
WKInterfaceControllerのopenParentApplication:reply:メソッドを使うことでiPhone側の親アプリを起動することができます。現在のところ、親アプリのみ起動が可能。
一つ目の引数に渡したいデータを入れればOK。
iPhone App側の実装
- (void)application:(UIApplication *)application handleWatchKitExtensionRequest:(NSDictionary
*)userInfo reply:(void(^)(NSDictionary *replyInfo))reply
Watch Kit App
からiPhone側の親アプリが起動されたとき、application:handleWatchKitExtensionRequest:reply:メソッドが最初に呼ばれます。渡ってきたデータを利用することができます。
URLスキームを設定していれば、特定のページへ遷移させることも可能。
GitHub WatchKitCounterObj01
▫️参考にしたページ
WatchKit AppからiPhone Appを起動する方法
WatchKitにおける iPhone Appとのデータ共有
はじめてのiOS ~Counterアプリの作り方~ Objective-C
Objective-CをつかってiOSアプリを作る際に気にした方が良いTips NSDictionary
コメントをお書きください